Enjoying the Small Things

Enjoying the Small Things

  • ABOUT
    • KELLE HAMPTON + ETST BLOG
    • Our Down Syndrome Journey
    • Down Syndrome: Our Family Today
    • PRESS
  • the book
  • The Blog
    • Make Stuff
    • Family
    • Favorites
    • Parenting
    • Parties
    • Style
    • Travel
  • Once Upon A Summer PDF
  • Printables
  • CONTACT

Shrimp and Rice with Poblano Peppers

February 9, 2021 By Kelle

We’ve been trying to expand our repertoire of meals beyond the repetition of tacos, spaghetti, chili and in doing so have pulled some of our old favorites from the archives. Last year during one of our meal brainstorming sessions, Brett reminded me of something I used to make a lot in my teaching days. “What was that shrimp thing you used to make with the peppers?” Ah yes! Shrimp & Rice with Poblanos.

It had been years since I had made it, so I whipped it up again and the rest is history. Brett proclaims he could eat it every night. It’s since become the MVP meal of the pandemic and the answer to every “What should we make tonight?” question. With just a few ingredients, it’s easy and quick to make. We like ours pretty spicy, so if we want the kids to eat it, we put a little shrimp and rice aside before we add the spice and the “green stuff” that will ruin any chance of Dash and Nella going near it. I always have a bag of Trader Joe’s shrimp in my freezer for this meal because Brett asks for it at least once a week.

What you need:

Rice (we usually use white, but you could absolutely make this with brown rice). We follow the cooking instructions to yield 6 cups, but that has to be a lie because it looks more like 3-4 cups.

2 Poblano Peppers

2-3 limes 

Cilantro

Cooked Shrimp (I always buy the bag of medium frozen shrimp from Trader Joe’s, but you could use fresh)

Cayenne Pepper (optional)

Cook the rice as instructed. While the rice cooks, boil your shrimp and take the tails off. Chop poblano peppers and sauté in frying pan with olive oil. When rice is cooked, add shrimp and cooked poblanos. Juice 2-3 limes (I like mine super limey) and add to rice. Chop cilantro (we use one whole bunch), mix into rice and add salt, pepper and cayenne to taste. It’s a 15 minute meal, and it’s amazing.

I was at the grocery store yesterday and called Brett to ask him what he wanted for dinner. He asked for shrimp and rice, and I told him I’m cutting him off. This is getting ridiculous.


Filed Under: Home, Make Stuff, Uncategorized 3 Comments

Dryer Ball Snowman Ornaments

November 23, 2020 By Kelle

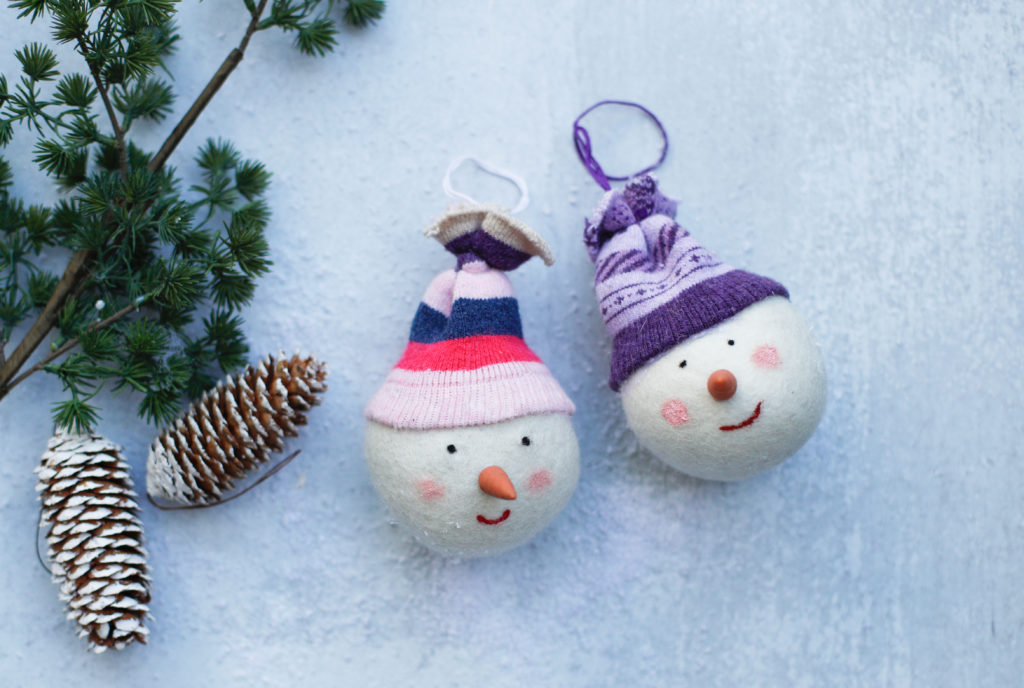
If you’re looking for a cute and simple ornament craft for this holiday week, we made these little snowmen ornaments last week, and they turned out so cute! I used to make a styrofoam ball version of these with my fifth grade students, but the dryer ball ones are way cuter. It’s a great craft to make with a group of kids/siblings because you can buy dryer balls and socks in multi-packs.

Here’s what you need:


We used these socks and these ones, and both the toddler and little kid sizes worked great because they stretch. We used these dryer balls which run a little over $1 each. You can find little carrots or something comparable in the miniature aisles of a craft store, or there are lots online—like these ones (200 in a pack—ha!), these ones or this cute button version. The thread/string is to tie the hat shut. You don’t really need the needle if you want to secure a hanging ribbon with glue (for those who are scared off by any sewing :o), but I used it to sew a string loop to the inside of the hat to hang it on the tree when the ornament was finished.

1. Stretch the open end of the sock around the dryer ball to where a hat would sit. Hot glue under the edge of the hat and secure to dryer ball.

2. Snip the top of the sock off to your desired hat height. ‘

3. Tie a string around the top of the hat (I left a little bit of the sock to show) and tightly secure with a knot.

4. Hot glue the carrot nose and paint on eyes, pink cheeks and a mouth. If you use a carrot nose that has a little “insert extension,” just poke the dryer ball with some sharp scissors to create a little hole for the extension to go into.

5. Secure a hanging loop string or ribbon with a needle & thread or hot glue (you could even safety pin it to the back of the sock). And that’s it! Your ornament is done.

*A friend just reminded me dryer balls are great for holding essential oil scents, so if you want to level up, try rubbing some peppermint, balsam or clove scented oil to make your ornament holiday extra.

These make cute gifts for grandparents, friends or an adorable way to decorate a gift. Our tree is happier.

Happy Monday!

Filed Under: Holiday, Make Stuff Tagged With: Christmas Craft, Ornament Craft, Snowman Ornament 1 Comment

Summer Fairy Houses

June 26, 2020 By Kelle

This post is sponsored by Stonyfield.

Hello from Northern Michigan! We made it to my dad’s cabin after a 5-day road trip here and are now safely tucked into the woods with our family, stashing away summer memories in our favorite place. We brought books and crafts and twinkle lights–the Holy Trinity for summers up north.

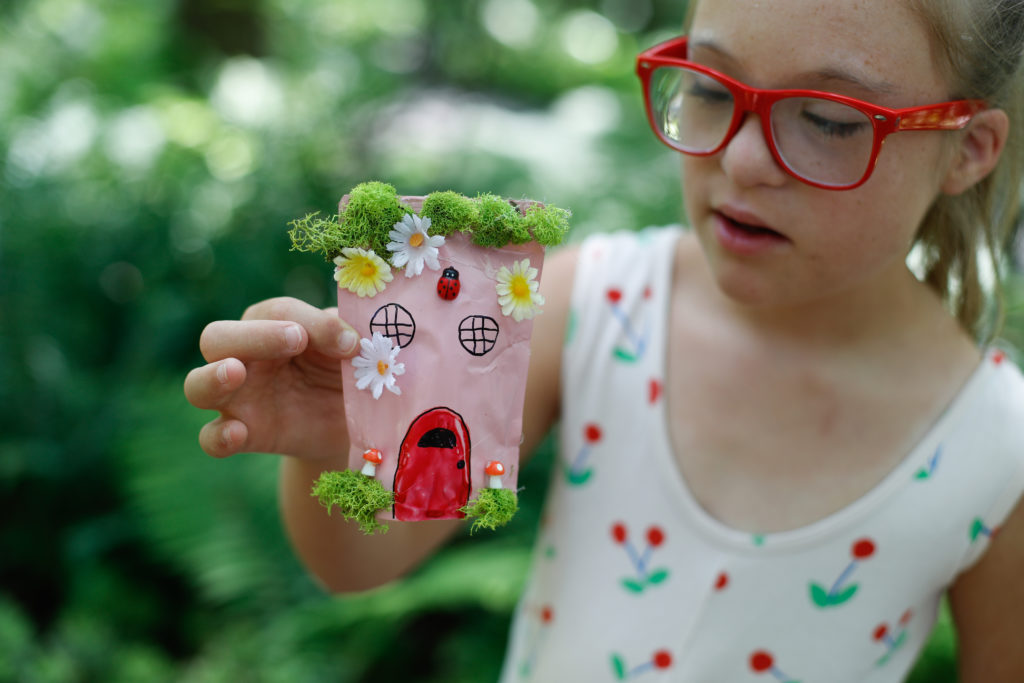
A few years ago, we started a tradition making fairy houses, an idea born from a little box I found by the lake several years ago. “Fairies” was written in fat black marker, and the box had been left next to the dock steps by an unknown kindred spirit who believes in the kind of summer magic I love. In previous years, I’ve ordered milk cartons to make our fairy houses, but this year we were resourceful and reused the packaging from our favorite Stonyfield yogurt pouches, a treat we’ve been enjoying for years. I always have them in the refrigerator for lunches (especially when I was packing lunches), but they’ve been such a great on-the-go treat for summer as well (the pontoon cooler is full of them :).

My favorite is the Pear Spinach Mango pouches. They’re perfect for making fairy houses because A: Recycle, Reuse!, and B: they’re waterproof, so you can leave the outside. We went ahead and used the Stonyfield box the pouches came in for an added building in our fairy village, but the box won’t last as long as the pouches.

My kids LOVE this tradition, especially because our fairy house creation day always ends with a special surprise. Once we set up the houses in the garden, the kids sprinkle glitter around the fairy houses to lure the fairies in (they fly so fast, you need something sparkly to catch their eyes!). When we aren’t looking, they swoop in to the houses and leave candy treats.

Here’s how we made our fairy village:

After we enjoyed our yogurt, I rinsed out all the pouches (you’ll want to get all the yogurt residue out if you’re going to leave them outside so they don’t bring in critters), dried them and then spread them out (along with the box they came in) on a tarp. We spray painted them with a base color. I wasn’t sure if I was going to keep the caps on or not, so I left them at first but ended up cutting them off when they dried. To keep the pouches sturdy and weight them down so they stand up well on the ground, you can funnel a little sand or dirt in them after the paint dries.

Then the fun part begins. We used craft paint, some silk flowers, Sharpie markers, a package of moss I picked up at a craft store, a few little butterflies and dragonflies, and this amazing kit of fairy decorations that has plenty of enough supplies for a large group of kids to make their fairy houses (we had lots left over).

And then the kids went to town with the glue gun.

They turned out so cute!

The best part…glitter magic.

The fairies came later in the evening, leaving lollipops and chocolates.

The fairies now have their own little village in the garden, and we have lots more Stonyfield yogurt to carry us through our summer adventures. The pouches are great for road trips too because no mess! We’re also big fans of their smoothie pouches. And, as always, all Stonyfield products are made without the use of toxic persistent pesticides, artificial hormones, antibiotics or GMOs. You can find Stonyfield products at most supermarkets and natural food stories.

Filed Under: Make Stuff, Uncategorized 4 Comments

  • 1
  • 2
  • 3
  • …
  • 23
  • Next Page »
  • Facebook
  • Instagram
  • Pinterest
  • RSS
  • Twitter

Popular Posts

Shop My Favorites

Keep In Touch

Bucket Lists

ARCHIVES

Archives


“One of the most emotionally stirring books I’ve ever read….a reminder that a mother’s love for her child is a powerful, eternal, unshakable force.”
Ree Drummond, The Pioneer Woman
  • Home
  • About this Blog
  • BLOG
  • BLOOM
  • Favorites
  • Parties
  • PRESS
  • CONTACT

Copyright © 2022 · Kelle Hampton & Enjoying the Small Things · All Rights Reserved