Enjoying the Small Things

Enjoying the Small Things

  • ABOUT
    • KELLE HAMPTON + ETST BLOG
    • Our Down Syndrome Journey
    • Down Syndrome: Our Family Today
    • PRESS
  • the book
  • The Blog
    • Make Stuff
    • Family
    • Favorites
    • Parenting
    • Parties
    • Style
    • Travel
  • Once Upon A Summer PDF
  • Printables
  • CONTACT

Holiday Photo Tips…and a Surprise–the Course You’ve All Been Asking For

October 10, 2018 By Kelle

Since now is the time many families are planning their annual holiday card photo, yesterday I shared tips for choosing outfits for the family. Now that you’ve settled what you’re going to wear for your family photo, let’s talk about getting the actual photo taken. Investing in a photographer is definitely worth it so that you can sit back and let the professional take care of getting beautiful images, but it’s not always in the budget, especially during the holidays. There are other ways to capture a great family photo on your own though. A tripod and self-timer (or wireless remote shutter) can work, but one of the best ways to ensure a great family photo is to swap photographer duties with a friend’s family–both families get dressed for the annual photo and head out together to a great location. You take your friend’s family photo, she takes yours, and then you all go out for dinner after to celebrate having it finished. If you’re not hiring a photographer, here are a few tips to help you capture a a great image of your family this year.

Location Scout
The right background can set the scene for an image, but it’s good to do a little homework before your photo (it can also help guide your outfit selection). If you live in the mountains or near captivating landscape scenes, you might want more of a nature look in the background–a creek, the woods, a mountainous backdrop, a field with a red barn. If you live in the city, the urban scene may direct your shot more–old brick buildings, colorful store fronts, cool alleys with interesting textures. We live near the beach, but we have so many beach photos throughout the year that I usually gravitate toward something different for our family photo. Sometimes that includes driving around and looking for new locations–they’re hidden everywhere. Last year’s photo (that was snapped by a friend who had never taken family photos and took only five minutes!) was taken at a platform of our city dock.


Other photos in this post include the blue garage door of an old warehouse on a side street, the back of a restaurant that had shut down, the side wall of a store downtown and a historic building in a state park. As you’re driving around, keep your eyes peeled for interesting backdrops, colorful walls (or white), great architecture, fun textures or anything that might add to a photo. If you’re going to add text to your card, keep in mind that you’ll want some clean space in your shot to insert the card greeting. For instance, the photo below was taken in front of a commercial building with white walls and works great for adding text at the top (red, of course!).

The Right Time
Choosing the right time of day to take your photo can make or break an image. If you’re out in the open when the sun is blaring, you’ll likely encounter unflattering shadows, squinting and light spots. The rule of thumb for outdoor photography is to shoot during the golden hour–one hour before sunset. Look for shaded areas and natural reflectors (white walls are great). Also, consider what the environment will look like during that time. When shooting in urban areas, I like to shoot on Sunday evenings because a lot of the businesses are closed which opens up some otherwise occupied areas.

(tip: If we were to take this photo over again, I’d move us all away from the wall for some depth of field. Put space between the subjects and the backdrop. If you’re in front of a wall, get several steps away from it.)

Break up colors and Research Positioning.
Positioning everyone can be the most challenging part of taking photos. You want everyone to look as natural as possible. To begin, break up colors so that two people who might be wearing the same color aren’t standing together. One of the best ways to create good positioning is to research great photographers and screen shot group photos you love that feel natural and are aesthetically pleasing. Pull out those photos and use them as inspiration as you’re getting ready to shoot your own photo. You don’t have to recreate it exactly, but it can be great guidance as you tell people where to stand (and people like to be told where to stand! Brett often says, “If you tell me what to do, I’ll feel more natural, but I need some direction.”)

“Act Natural, Everyone!”
Easier said than done! Ideally, a photographer directs the shot and is skilled at making everyone feel comfortable and interact with each other. Personally, my favorite photos are ones where everyone isn’t looking at the camera. The shot below was taken as we were warming up for “the shot” when everyone was kind of goofing around. I ended up choosing it over the one of everyone looking because it’s more natural, more “us” and expresses our personalities more. As you’re taking photos, it’s great to take a few of the family doing something together–talking to each other, having one of the kids tell a joke, fixing someone’s hair, playing peek-a-boo, etc.

Welcome Toys & Kid Props
The scruffy old teddy bear your daughter drags around, the favorite baby doll, the Superman toy you’re inclined to take away from your son before the photo (don’t–he’ll cry)–keep them in the shot. They may help make the kids feel like they’re not getting their picture taken, they add a great interesting element to the photo, and they help capture identity–so much fun to look back on years later and remember what was loved most. The photo below is one of my favorite family photos ever taken of us, even though our faces aren’t all showing. I’ll never forget how much fun this shoot was, how funny it was trying to keep Dash from getting grumpy and that dang garbage truck that made it into every shot. It wasn’t planned, but that little pop of green and symbol of boyhood ended up adding so much to our photo that year.

Embrace the Mess
Got a runner? Embrace it. The year this photo was taken was the hardest because Dash wanted to MOVE. We finally just let him loose and Heidi kept shooting. This shot ended up making the back of our card with the line from ‘Twas the Night Before Christmas: “Now dash away, dash away, dash away all!”

Remember there are so many ways to capture a family besides lining everyone up and making them smile at the camera. Keep shooting when the kids are going bananas. Laugh at the mess. Embrace it. Have fun with it. Have parents put kids on their shoulders. Tell everyone to bust out their favorite dance moves. Make everyone hug, hand clap, do the Macarena. Whatever. But you are likely to capture the true essence of your family when you’re not aiming for perfect.

Zoom In.
While you’re shooting the whole family, remember there are images “within” images. Zoom in closer for some beautiful individual shots. The colors and textures of the surrounding people automatically create a great backdrop.

The best shots come after “the shot”
Everyone just put their guard down because they think the shoot is over? Shhhhhh. Keep shooting. Capture individual interactions, brothers wrestling, daughters’ arms stretched around their daddy’s legs. These are great photos to keep and often end up making it into the card.

Got the shot? What next?
Remember, you can always edit photos after they’re taken to make them brighter (friends don’t let friends send dark pictures), add contrast, or adjust saturation. I like a good crisp, colorful image for our family photo, but sometimes–especially with muted light tones–a more vintage, washed-out look is preferred. Whatever the case, once your images are exactly to your liking, you can either print them and slip them into your own cards or have them made into cards online, using free design services. Minted, Tiny Prints, Pear Tree, Shutterfly and even Costco have great printing options within different price ranges.

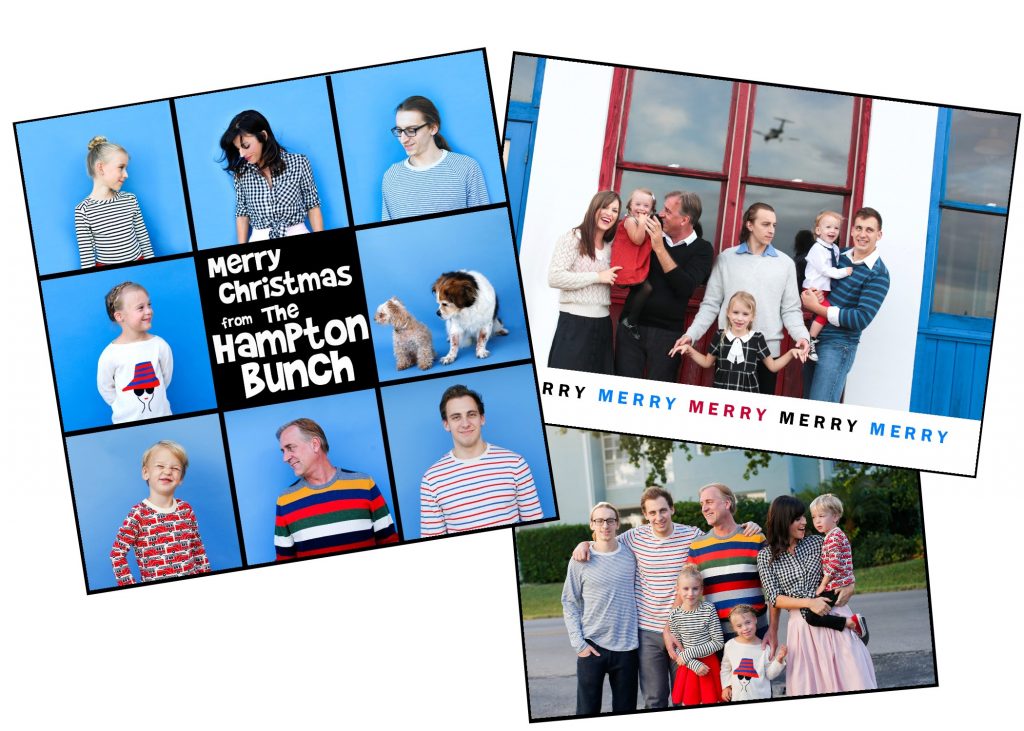
(still one of my favorite cards we ever sent…this was in the inside)

…and another favorite inside, back before Dash was born:

Now comes the good part. As the holidays approach, they bring with them so many gorgeous scenes and memorable moments to capture. If you’ve ever been interested in exploring creativity through photography and need some help, I’m hosting Framed!, a 3-week live online photography course (starts in November and ends before Thanksgiving!) that will help you create meaningful and memorable images from the moments you love. In countless e-mails, direct messages and blog comments, readers have been asking me to create this course, and I’m so excited to finally launch it. There couldn’t be a more perfect time of year for this as my passion for photography comes alive through seasons I love most. Come along with me this year as I capture some of my favorite images of the year and teach you how to do the same. This is a great class for beginners, and you don’t even need a big fancy camera to benefit from it (iPhones and Androids are just fine). Whether you want to capture better day-to-day life images for your own enjoyment or want to take your blog and social media photos to the next level, you’ll be inspired by this course and community. (If you have a teenager with a creative itch for photography, this is perfect–I’ll take care of them!) Want to participate? You can read all the details HERE! Join FRAMED!

Framed Photography Digital Course Kelle Hampton

Filed Under: Uncategorized 5 Comments

What to Wear: Coordinating Family Looks for the Holiday Card Photo

October 9, 2018 By Kelle

I know, I know, it’s not even Halloween yet, but in the photographer’s world, this is prime family photo season as families across the globe scramble to put outfits together for the annual Christmas card photo in an attempt to “get it over with” before things get crazy. With the big boys out of the house and more harried schedules for all of us, our annual family photo does, of course, bring a teeny bit of stress; but it’s a tradition that yields images we’ll cherish for years to come and often the only ones from the year that capture all of us together (looking half decent). In a perfect world, our annual family photo would be one of the beautiful unplanned, uncoordinated moments in our home where no one’s looking, no one’s matching, and the magic of our love casts an aura across the lens, but let’s face it. Those moments are hard to capture. So, a coordinated family photo it is for us.

So, the big question for so many families is…what do we wear? Oooh, oooh, I know this one! (hand waving dramatically) Pick me! Pick me! Coordinating outfits for family photos is one of my favorite things to do–so much, I’ve been known to take over this job for many of my friends’ photos (they willingly give it to me). Today, I’m sharing a few tips for choosing clothes for family photos as well as four themed style guides, and tomorrow I’ll be back with tips on attempting your own photos if hiring a photographer isn’t in the budget. Last year, Heidi got stuck in traffic on the way to our family photo shoot, so I handed the camera to a friend who was tagging along, and ten minutes later, our photos were done. It doesn’t have to be a big production.

A few things to consider…

Will the photos be displayed in your home?
If you intend to enlarge and display photos from your shoot, you’re going to want to consider the color palette of your home in choosing outfits. A selection of bright and fun jewel tone clothes, for instance, probably wouldn’t be the best choice if you’re going to display a large image in a living room with muted earth tones.

DON’T GO MATCHY MATCHY!
When I used to do more family photography and a family reported they were considering white shirts and khaki pants for all, I’d A: Get it together to keep my sarcasm in check, and then B: Calmy guide Florence toward a less 1989-Olan-Mills look. Sometimes it sounded like, “Hell no, Flo.” Might I suggest the following rules: Do not have everyone wear primary colored polos. One polo is okay. Five colored polos says,”We are going on a rainbow golf outing, and our mom is forcing us all to wear these.” Two people wearing jeans is okay. Six people wearing the same shade of blue jeans with black turtlenecks says, “We are in a cult, and this photo is going to show up in an Internet meme in T-minus-two-days.”  BREAK IT UP.

Throw in something unexpected.
Mix prints. A bright pop of color. Have someone wear a graphic tee. Bright pink with light pink. Wear a dress, but skip the dress shoes for sneakers. Break the rules. I love throwing something unexpected in our outfits–it keeps it from looking too perfect. One year, Austyn showed up to our shoot wearing camo shorts, and while I didn’t love it at first, it added such a great unexpected element and made our photos more fun. As if chasing Dash that year wasn’t fun enough.

Choose clothes that represent your kids’ personalities
If your kid dresses like a skater, let him dress like a skater for the family photo. If your daughter loves wearing Chuck Taylors, choose the Chuck Taylors to go with her dress for family photos. If your little one is wonderfully wild and crazy, let it show in the photos. Dash’s sweater in last year’s photo had a giant tiger on it, and I love it because it’s so him. In other words, don’t button up the things you love about your family for the photo…let it loose in the clothes you choose. You can coordinate and dress it up a little while still hanging on to everyone’s personality.

Keep it casual.
The best photos are ones that maintain a natural feel and ones where everyone looks comfortable. If everyone’s dressed like they’re going to a prom formal, likely no one’s comfortable, and it will show in posture and strained facial expressions.

Now that that’s out of the way, here are four color palettes with sources that show how outfits can come together with a coordinated feel without being too matchy. Note the unexpected elements in each ensemble–pops of color, leopard print touches, sequins and mixed shades. Now, can you guess which set is my favorite?

E A R T H   T O N E S

1. Dad
H & M Men’s Sweater
H & M Men’s Black Slim Jeans
H & M Men’s Desert Boots

2. Mom
H & M Women’s Ruffled Dress
Zara High Heel Leather Boots

3. Sister
Old Navy Oatmeal Ruffle Sleeve Sweater
Old Navy Girls’ Ballet Pink Jeggings
Zara Girls’ Ankle Boots

4. Sister
Zara Floral Print Dress
Wonder Nation Girls’ High Boots

H & M Boys’ Rust Slim-Fit Twill Pants

5. Brother
Mabo Kids Charcoal Stripe Tee
H & M Slim Fit Pants
Old Navy Sueded Boat Shoes


M O O D Y   B L U E S

1. Dad
H & M Men’s Light Blue Sweater
H & M Men’s Skinny Cords

2. Mom
Zara Women’s Cobalt Sweater 
Zara Animal Print Skirt
Noonday Collection Timber Hoop Earrings
And Other Stories Suede Kitten Heels (have the serious wants for these babies)

3. Sister
Gap Girls’ Ice Blue Bobble-Knit Sweater
Nordstrom Girls’ Wide Leg Jeans
Old Navy Faux Suede Flats

4. Brother
Boys’ Bear Graphic Sweater
H & M Boys’ Slim Jeans
Cat & Jack Sneakers

5. Sister
Janie & Jack Cobalt Knit Dress
H & M Navy Satin Ballet Flats


T H E   F U N   F A M I L Y

1. Dad
J. Crew Slub Knit Tee
Men’s Red Adidas

2. Mom
H & M Women’s Pink Sweater
Banana Republic Women’s Yellow Pants
J.Crew Silver Sequin Boots (on my birthday wish list)

3. Sister
Hanna Andersson Fair Isle Sweater (in my cart right now)
Cat & Jack Girls’ Skinny Jeans
Pink Converse

4. Brother
Boden Boys’ Stripe Tee
Cat & Jack Jeans
Boys’ Suede Pumas

5. Sister
Shein Green Dress
L’Amour Yellow Flats

C L A S S I C   C H R I S T M A S

1. Dad
Old Navy Jade Sweater

2. Mom
Boden Women’s Riley Blouse (obsessed with this blouse!)
Gap Women’s Red Plaid Pants
Zara Slingbacks

3. Sister
Zara Striped Sweater
Zara Girls’ Buttoned Pants
Zara Red Boots

4. Brother
Janie & Jack Fair Isle Sweater
Old Navy Jeans
Gap Mid-top Dress Sneakers

5. Sister
Next Direct Navy Dot Tea Dress
Gap Gold Sequin Flats

Filed Under: Family, Fashion, Holiday, Uncategorized 6 Comments

Easy Caramel Apple Pop Tarts

October 5, 2018 By Kelle

On a rainy morning in Washington D.C. a couple of weeks ago, I had one of those memorable food experiences–the perfect setting (bar window seats looking out to 14th street, the girls by my side) combined with the perfect pastry–Ted Bulletin’s famous pop tart (so many IG readers told me I had to try it!). It was insanely delicious–so memorable that I wanted to try and recreate a version of it, so last weekend we took a shot and made a fall version–the caramel apple pop tart.

I’ve seen more elaborate pop tart recipes that layer dough, but I wanted something simple and quick so I used my mom’s pie crust recipe because it never fails me. We filled our dough with apples and cinnamon, spooned a little powdered sugar glaze over it and then, once set, drizzled caramel on the top. They were quick and easy to make–the perfect weekend treat, and everyone loved them.

Preheat Oven to 375° F. Recipe makes 4-6 pop tarts, depending on how big you make them.

Pop tart Dough
1 cup flour
1/2 cup shortening
1/4 tsp. salt
1/4 cup milk

Pop tart Filling
3 large apples
2 tbsp. sugar
1/2 tsp. cinnamon
lemon juice

Glaze
powdered sugar
milk
8-10 caramels

I’ve made my mom’s pastry dough so many times, I could mix it in my sleep. Pour the flour and salt in the bowl first, add the shortening, and then thoroughly fork the shortening into the flour until the dough looks like little peas. Slowly add the milk, folding it into the dough with the fork to mix. I always take over with my hands to get it thoroughly mixed, making a big dough ball. For a flakier pop tart, chill the dough first, and then transfer the dough ball to a floured surface. I don’t know if the next step matters, but I follow my mom’s dough voodoo to a T, so here’s how it goes: you punch the dough once and then talk to it like you’re its mother. Tell it what to do and “show it who’s boss,” as my mom says. Then roll it out to about 1/4 inch thickness. Dash was getting a little frustrated that the dough wasn’t doing what he wanted it to do, so Brett came in with Bones to avoid a meltdown. His little smile.

Cut the dough into rectangles (ours were about 4 inches long, but you can make them whatever size you’d like). Brush a little beaten egg with milk to the top of the bottom layer if you want to ensure the filling sticks.

For the filling, peel and chop the apples into small pieces and add cinnamon, sugar and a little lemon juice.

Scoop a small spoonful of filling onto one rectangle and cover it with another dough rectangle.

Seal the pop tart by forking the edges together, and cut a little “x” on the top for venting.

We greased a sheet of aluminum foil on top of a cookie sheet to avoid a messy pan, but next time I make them, I’m skipping the foil because I didn’t grease it very well, and a couple pop tarts were hard to pull away from the foil after they baked.

Bake pop tarts at 375° F for 20-25 minutes or until golden (check them closely toward the end).

Pull tarts out of the oven and let them cool 5-10 minutes before removing them from cookie sheet. In a bowl, mix a little powdered sugar with milk and vanilla (I never measure this) to desired thickness to make your pop tart glaze. When tarts are cool, spread glaze on top. Unwrap caramels and place in microwave-safe bowl with 1/2 tsp water. Microwave in 20 second increments until melted and stir. When glaze is set, drizzle caramel over the tart. The kids loved the caramel glaze, but I think I would have loved it with just a little cinnamon and sugar sprinkled over the top.

Either way, the finished product was delicious and initiated our fall baking season.

Happy Weekending, Friends!

Filed Under: Make Stuff, Uncategorized 12 Comments

  • « Previous Page
  • 1
  • …
  • 38
  • 39
  • 40
  • 41
  • 42
  • …
  • 437
  • Next Page »
  • Facebook
  • Instagram
  • Pinterest
  • RSS
  • Twitter

Popular Posts

Shop My Favorites

Keep In Touch

Bucket Lists

ARCHIVES

Archives


“One of the most emotionally stirring books I’ve ever read….a reminder that a mother’s love for her child is a powerful, eternal, unshakable force.”
Ree Drummond, The Pioneer Woman
  • Home
  • About this Blog
  • BLOG
  • BLOOM
  • Favorites
  • Parties
  • PRESS
  • CONTACT

Copyright © 2026 · Kelle Hampton & Enjoying the Small Things · All Rights Reserved