Enjoying the Small Things

Enjoying the Small Things

  • ABOUT
    • KELLE HAMPTON + ETST BLOG
    • Our Down Syndrome Journey
    • Down Syndrome: Our Family Today
    • PRESS
  • the book
  • The Blog
    • Make Stuff
    • Family
    • Favorites
    • Parenting
    • Parties
    • Style
    • Travel
  • Once Upon A Summer PDF
  • Printables
  • CONTACT

Pooch Portrait Art

February 20, 2018 By Kelle

Okay, dog loving friends. Or cats. Or birds. Or whatever living creature it is that calls your place home and maybe–if he’s lucky–gets his name added to the holiday cards. So your pooch might not love when your kids are holding him hostage to dress him up in doll clothes. Here’s a chance for the kids to get what they want without the dog’s distress and the next rainy day activity–pooch portrait art. We made these this weekend, and we were dying laughing at how ridiculous Latte looks all dressed up–but also…So. Much. Fun. And don’t think for a second that you have to have kids as an excuse to make one of these. I think a whole gallery wall of these over a bar cart in a dining area or in a fun colorful bathroom would be hilarious.

 photo print 92_zpscxpwgkcq.jpg

Here’s what you need:

1 8 x 10 photo of your animal’s head
11 x 14 oval stretch canvas
Mod Podge (we used satin)
Decorative scrapbook paper
Accessories: felt, pom poms, glitter, bows, buttons, pearls, rhinestones, etc.

We used these 11 x 14 oval stretched canvases (ready to hang) from Hobby Lobby ($8.99 each but click on the “40% off one item GET COUPON” button at the top of the site, and you can either print the coupon to use in store or use the code online). I picked up two of Lainey’s friends this weekend and ran inside to get a picture of their dog, so they could each make one of their own dog (printed them 1 hour at Costco).

As for the pictures, you don’t need a studio backdrop, and you can zoom and crop later. Just make them sit, hold a treat and snap it fast. For moody cats, God speed, because I don’t know how to help you there. Here’s what we started with:

 photo blog 1_zps1hxthhii.jpg

After you get your photo, crop and zoom so that just the head and neck area of your pooch fills an 8 x 10 print. Once it’s printed, cut out the head to be mounted on the canvas (wait to mount it though).

 photo blog 4_zpsjfql89of.jpg

 photo print 86_zpsyru2davy.jpg

The fun part comes when you build your dog’s outfit and match their personality with paper patterns and clothing designs.

 photo print 87_zpsts40xwpg.jpg

Before you mount the head, you’ll want to use it as a guide to cut out outfit shapes to see where necklines should fall. We didn’t have any stencils ,so we just winged it with trial and error for outfit details, but that made it even more fun. We started cutting out basic t-shirt shapes from the scrapbook paper to make the dress/sweater base and, trimmed them down and then added collars, buttons, bows, jewelry, etc. We didn’t adhere anything with Mod Podge until we had our entire design laid out. Once you know what you want, you can begin securing everything, starting with the bottom layer, with Mod Podge (only the flat items like paper and felt. Once everything dries, you can use hot glue to add your 3-D accessories like bows, buttons, pearls and rhinestones). Use Mod Podge like glue, brushing it on the back of each piece and securing it to the canvas, and then brush a layer of Mod Podge all over the top of the canvas for that decoupage effect (it will look murky but will dry clear).

 photo print 85_zpsnsoqs55z.jpg

 photo print 83_zpsyn38v0iu.jpg

Once it’s dry, hot glue your 3-D accessories in place–pom-poms, pearls, bow ties, buttons, etc.

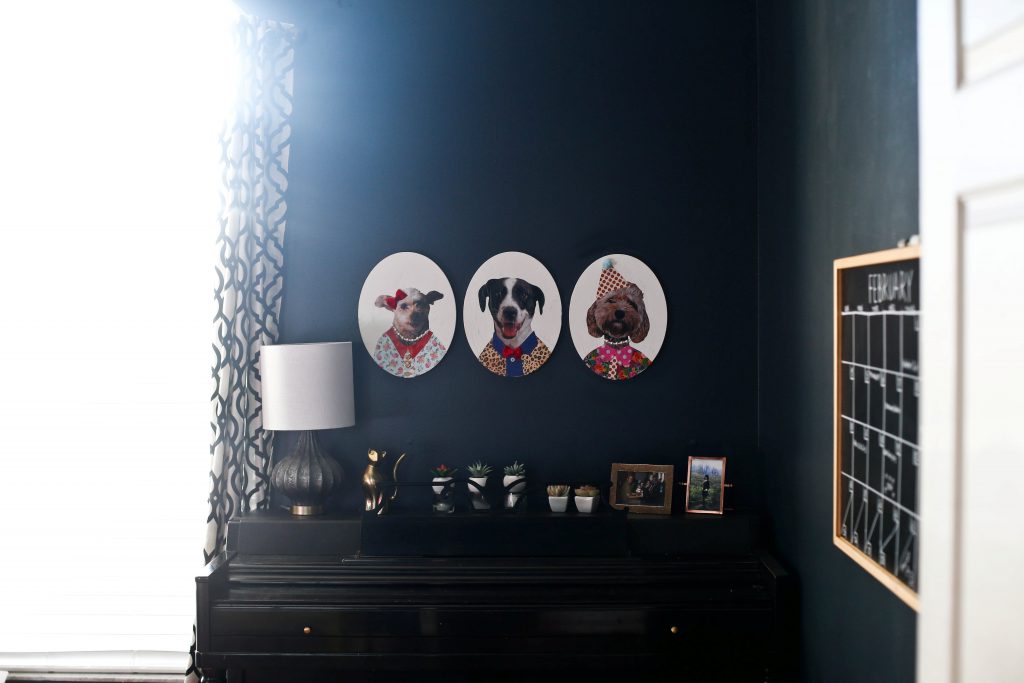
I can’t take it. Latte’s ears. And Diesel is so dashing!

 photo print 92_zpswkm8wfw5.jpg

You should know that Lainey’s friends left their portraits to dry, and I kept them and hung them in my own house because I’m not, like, a regular mom. I’m a jackass mom.

 photo print 89_zpspvqawdxs.jpg

(tried above Lainey’s desk first, but they were competing with that wallpaper a bit)

I’ll give them back eventually.

 photo print 93_zpsqc2jcfgv.jpg

Brett wants me to make one for Sophie which I love so much, so I’m on it. Time to go through the old folders of Sophie photos (hold me).

Filed Under: Make Stuff 4 Comments

Easiest, Inexpensive Gift with Meaning: Personalized Coffee To-Go Cups

December 4, 2017 By Kelle

Happy Monday–the first Monday in December which makes the edge of not-everyone’s-favorite day softened just a bit, right?

I have a quick and easy D.I.Y. post to start the week today. My love of doodling–on scrap paper, the back of bills, restaurant napkins, etc.–triggered an idea for an easy, inexpensive gift this year. Why not doodle on to-go coffee cups and package them up with a bag of french roast for coffee-loving friends who take their morning cup out the door?

I ordered this 50-pack white hot drink cups with lids and heat sleeves which has enough cups to make personalized coffee packs for several friends. Lainey wants to make some for her teacher now with compliments and the things she loves most about her written all over them.

All you need is cups and Sharpie markers. Doodle away…
 photo cups 1_zpstb9wjkj8.jpg

…and add a bag of coffee.

 photo cups 2_zps2kdghk2e.jpg

We found the perfect coffee cup ornament at Target to tie on the outside of the package.

 photo cups 4_zpsenh4m2e3.jpg

Wrap up with some cellophane, tie your ornament to the outside, and there you have it…a merry little Christmas for coffee-loving friends.

 photo cups 5_zpsjp5o8izy.jpg

I love any opportunity to turn little ones’ artwork into gifts, so this works great for little preschool doodles too. Also…coffee. Coffee always wins.

Happy Monday!

Filed Under: Make Stuff, Uncategorized 9 Comments

Make It: Cozy Fall Campfire Night Light/Place Setting

November 2, 2017 By Kelle

So, the girls have fall parties in their classes tomorrow and, like usual, I wait until a couple days before to plan a craft. I knock it out of the ballpark once it’s done, but I never can seem to get it together in life except for ONE DAY BEFORE. Thankfully, I always share room mom duty with a more responsible mom who remembers to e-mail the parents and take money for donations and doesn’t forget that there’s a party around the corner. I love when I find a good Excel spreadsheet-loving mom to join powers with my glue gun and felt love. So, where were we? Back to the craft. I had picked up a bunch of LED tealight candles on clearance a while ago, thinking I’d throw together some fall candle holder project for the Thanksgiving table. But I ended up updating an old campfire ornament craft I did a few years ago instead–this time to make a fall bedroom night light, and I love how it turned out. We’re calling these Fall Campfire Night Lights…

 photo campfire 4_zpsy7btqk8i.jpg

Cozy, cozy, fall, fall, fall.

 photo campfire 3_zpsbyjdgts8.jpg

They also look really adorable as a place setting for a campy fall dinner or party.

 photo campfire 18_zpsnccts7yf.jpg

They run a little over $1 a piece to make.

Here’s what you need:

 photo campfire supplies_zpszhqqmrq7.jpg

We did packaged wood disks for the class, but for a little more you can get these wood slices for a more natural look.

A glue gun will dry faster, but Tacky Glue works just fine as well and is better for students.

Glue a ring of pebbles along the edge of the wood disk.

 photo campfire 8_zpsgqyuq4a1.jpg

Place the tea light in the middle for placement reference, but don’t glue down. You’ll need to keep it free so you can lift it to switch the light off and on.

 photo campfire 9_zpsuezn6q9w.jpg

Break sticks to size and layer around the tea light, making sure the tea light can freely be removed. Glue in place.

 photo campfire 10_zpshifcctbz.jpg

 photo campfire 11_zpsmnutbgx7.jpg

Glue a small white pom pom to the end of a thin stick to create your marshmallow roasting stick.

 photo campfire 12_zpsxdfe0sjb.jpg

Secure to the bottom of disk/another fire stick with glue.

 photo campfire 13_zpsub91ol46.jpg

Cut four “flames” out of the tissue paper–two red, two orange. Glue to the edge of the tea light.

 photo campfire 6_zpspyyq7tcf.jpg

Turn tea light on and add flame to fire. Voila!

 photo campfire 15_zpsw655cycj.jpg

When you want to turn your fire off, just lift tea light and flip the switch.

 photo campfire 14_zps9era3qns.jpg

Add to a bedroom night stand for a cozy glow.

 photo campfire 5_zpstwjnqls4.jpg

Or plan a campy dinner, give every plate their own campfire place setting, and turn down the lights to see a collective cozy flicker.

 photo campfire 16_zpseomua895.jpg

Everything’s better in miniature!

 photo campfire 18_zpsnccts7yf.jpg

Now here’s hoping we get some cool weather this weekend for more real fires and marshmallow roasting.

Filed Under: Make Stuff 18 Comments

  • « Previous Page
  • 1
  • …
  • 5
  • 6
  • 7
  • 8
  • 9
  • …
  • 23
  • Next Page »
  • Facebook
  • Instagram
  • Pinterest
  • RSS
  • Twitter

Popular Posts

Shop My Favorites

Keep In Touch

Bucket Lists

ARCHIVES

Archives


“One of the most emotionally stirring books I’ve ever read….a reminder that a mother’s love for her child is a powerful, eternal, unshakable force.”
Ree Drummond, The Pioneer Woman
  • Home
  • About this Blog
  • BLOG
  • BLOOM
  • Favorites
  • Parties
  • PRESS
  • CONTACT

Copyright © 2026 · Kelle Hampton & Enjoying the Small Things · All Rights Reserved